Getting Started
This documentation is a set of guides and manuals for EnergyMachines™ Cloud, or simply “the Cloud”. What is the Cloud?
From the architectural perspective, the Cloud is a software stack that processes the input and output of all the hardware it controls, manages the associated database(s), and enables users to interact with said hardware.
From the user’s point of view, the Cloud is a set of web applications whose graphical user interface provides the tools to control and manage HVAC systems at one or more sites.
Before we proceed, let us introduce some terms and definitions:
- HVAC
- The entirety of heating, ventilation, and air conditioning systems on a given site, interconnected and controlled via a single centralized interface—the Edge server.
- Site
- A specific location (building or building complex) outfitted with an HVAC system.
- Project
- One or more sites with HVAC system(s) combined into a single framework with shared components and a common set of users.
- Edge server
- Backend part of the Cloud with its associated databases and the webstack for Local HMI, set up to control a single site.
Cloud Apps
The Cloud consists of two web applications:
Portal
Main article: Portal
The Portal provides access to all projects where the user has any access level:
- Viewer (allows to see the current status of the project(s) and the contents thereof)
- Manager (allows limited interactions with the project(s) and the contents thereof)
- Admin (allows all interactions with the project(s) and the contents thereof)
see Permissions for details.
The Portal has tools for configuring and managing Cloud components within the scope of a project. Once you open a project on the Portal, you can (depending on the access level):
- view, create, edit, or delete instances of the Cloud components;
- manage your global preferences and project configuration;
- subscribe to receive notifications and consolidated reports in cross-project monitoring tools such as Tag Watchers or Reports;
- manage project users and their permissions, etc.
HMI
Main article: HMI
HMI is a web app complementary to the Portal. Each project has its own instance of the HMI, and each such instance can only access its own project.
HMI does not have any tools for project management, as those are only available on the Portal. Instead, HMI allows users to interact with the HVAC equipment tied to the project, to monitor the project’s statistics and history, run health checks, and perform troubleshooting.
Here are some of the things you can do in the HMI:
- override the values of tags;
- deactivate an alarm and check the history of alarms and related actions;
- check event schedule, etc.
To summarize what distinguishes the Portal and the HMI:
- the Portal is where you configure the Cloud components, the HMI is where you interact with them, including:
- monitoring the current status
- viewing the history
- apply actions that do not change the configuration see Cloud Components below;
- the Portal can provide access to multiple projects, while the HMI is limited to one project per instance;
- the Portal has some cross-project monitoring tools not accessible via the HMI. On the other hand, the HMI can provide project history insights not available on the Portal.
HMI provides a brief overview of what you can do with the HMI and how you do it, along with links to more detailed manuals.
Local HMI
Local HMI is a stripped-down version of the HMI that runs on the local Edge server. It provides an essentially identical web interface with several key differences:
Local HMI uses a simplified authentication process where it only takes a valid PIN code to sign in. As such, local HMI does not require a full set of user credentials (username and password), nor does it support two-factor authentication. Consequently, since the user is not authenticated with their unique account, HMI logs do not identify the user(s) behind any actions performed via local HMI.
Although the Cloud-based HMI has a separate instance of the web interface for each project, it still provides remote access to all projects where the user is authorized to use HMI. On the other hand, local HMI is strictly limited to its specific project, as each instance of local HMI is rendered by the Edge server on site and is limited to the hardware on the server’s network.
While the Cloud-based HMI requires a working Internet connection, local HMI does not use the Internet at all. Instead, it can be accessed:
- by opening the web interface on the local IP address;
- via the physical terminal installed on the site.
This enables users on the site to troubleshoot HVAC equipment without relying on remote access, e.g., if the project has lost its Internet connection.
Cloud Components
The Cloud revolves around three core components, also referred to as “project assets” that form the backbone for most of its functionality:
Tags
Main article: Tags
A tag is a single endpoint that can fetch data from a connected HVAC device or generates data by executing a user-programmed scenario. Collectively, tags form the primary gateway through which the user can interact with the HVAC equipment on the site.
Tags are set up on the Portal and can be accessed via the HMI. Depending on how a particular tag is configured, users can:
- monitor its value in real time;
- check its history, e.g., to retrieve values from some time in the past;
- change the value of the tag.
Here is a basic example of what tags could look like:
- tag
Lab Wing/Thermometers/Temperatureshows the indoor temperature of the laboratory room. It returns a value that may vary. Since it is a sensor reading, users cannot rewrite it. - tag
Lab Wing/Cooling Circuit/Fancontrols the speed of the cooling fan. Its value is constant; however, since it is a hardware parameters,users with appropriate access can overwrite it.
Further reading
- Work With Pages and Analyze Trends present two methods for viewing tag values in retrospective.
- Write to Tags further details on how you can manually update a tag’s value.
- Tag Editor details on the multitude of tag parameters and provides an in-depth insight to how tags work.
Pages
Main article: Pages
A page is an interactive canvas where one can freely arrange various graphical elements, for example, to create an HVAC diagram for the site. Pages can be configured to show values of tags in real time, to display localized messages, and even to map tag values to a linear gradient, allowing to use color codes to visualize the current condition of an HVAC element.
Furthermore, a page can be shared with other users, even those without a Cloud account, in view mode. Additionally, a page can be linked to an alarm, allowing users to quickly access the graphical rendering of the system’s state when the alarm goes off.
Further reading
- Work With Pages is a brief guide to page viewing and collaborative tools.
- Page Editor describes how a page can be configured to meet your project’s needs.
Alarms
Main article: Alarms
An alarm is a user-configurable signal that activates when certain conditions are met. Alarms are designed to be a safety mechanism that notifies project users when an operational anomaly is detected. Most alarms are inherently attached to tags and can be configured to go off when a value ends up being outside its permissible range, goes up or down too drastically within a short period of time, or changes too frequently, among other things.
Here is a simple example of an alarm:
-
Lab Wing/Lab too hot!activates if the tagLab Wing/Thermometers/Temperaturereturns a value > 24 ºC.
We cannot allow the laboratory, which stores research samples, to be that hot. Luckily, both the Portal and the HMI have tools to notify their users about newly activated alarms.
Further reading
- Handle Alarms is a simple guide on how you can interact with alarms and address them using the HMI.
- Alarm Editor is a complete manual on the structure and configuration of alarms.
Cloud Documentation
This documentation consists of guides and manuals.
- Guide
- A simplified article that summarizes the core features of an interface and provides brief instructions on how to use them. Guides target novice users and are written to help them quickly figure out which steps need to be taken to achieve a particular result.
- Manual
- A longer article that explains in detail every parameter, function, or activity available in a particular interface. Manuals target more experienced users and leave it to them to decide what to do in the interface of concern, armed with the newly acquired knowledge.
This very article is a guide, and so are all of its daughter articles that you can find in the expandable index table to the left. Notably, HMI is a series of guides to walk you through the most important tools that the HMI provides. All other articles in this documentation are manuals.
Articles are organized in an hierarchical tree. For ease of navigation, the branching of that tree partly follows the structure of the Cloud UI. The rule of thumb is that one article covers one screen of the UI, Page Editor being the one notable exception. Articles cross-reference each other extensively since functionally related UI elements can be found in different parts of the software.
Paragraphs below highlight and explain the formatting conventions of this documentation, illustrated with screenshots.
Subtitular flairs
Documentation is structured to be reminiscent of a wiki and to follow the structural logic of the Cloud UI. Therefore, an article might contain a small subsection to summarize a feature available in that particular interface; the subsection is thereby linked to another article that expands on this particular feature. This is where subtitular flairs are used:
Fig. 1. Example of a subtitular flair.
Icons
Cloud UI uses clickable icons extensively to facilitate user interactions; hovering over an icon will display a tooltip with the name of the associated function of the UI. Documentation replicates these icons, followed by the function name in an accented font:
Icon and the related function's name as shown in documentation (above) and the Cloud UI (below).
 This button would be replicated in the documentation as .
Icons might also be used in article or section headings; heading-appropriate formatting applies.
Textual elements
In the documentation, references to non-clickable textual elements use an accented font; these include names of popup windows, dialogs, dropdown menus, input fields, etc. References to clickable textual elements other than hyperlinks mimic the actual style of those elements as rendered in the Cloud UI:
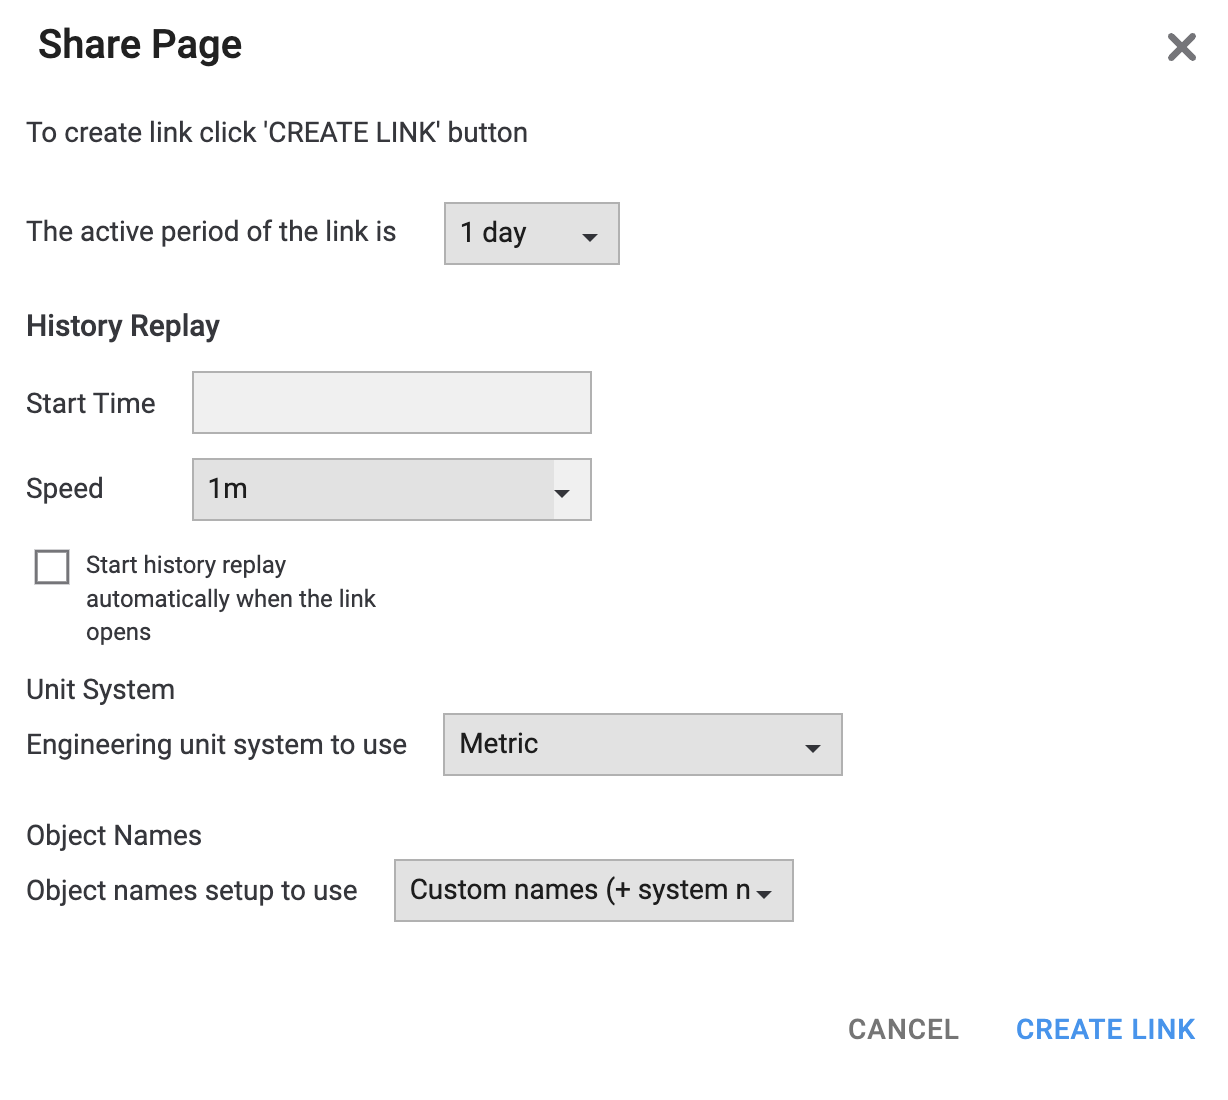
The name of this wizard would be rendered in the documentation as whereas the buttons closing the wizard would be rendered as and .